



Immunocytochemistry and Immunofluorescence Step by Step Guide
2026-09-20
Immunocytochemistry and immunofluorescence use antibodies and fluorescent labels to visualize specific molecules on the cell surface or inside cells. A typical workflow includes sample preparation, fixation, permeabilization, blocking, antibody incubation, counterstaining, mounting, and imaging.
Prepare healthy cell samples according to the experimental design. Cell culture is the foundation of the experiment, and cell condition directly affects the results.
1. Prepare coverslips or confocal dishes. Pre-soak coverslips in 70% ethanol. After they are completely dry, transfer them to a cell-culture plate using aseptic technique throughout.
2. Seed an appropriate number of cells on coated coverslips or plates so that confluence reaches 50–60% at the time of fixation. Excessively high or low cell density may affect normal cellular architecture.
3. Collect samples. For adherent cells, continue culture for 12 h and proceed after the cells have attached firmly. Suspension cells may be prepared by cytocentrifugation.
·Use freshly prepared samples whenever possible and confirm the abundance of the target antigen.
·Handle samples gently during all subsequent steps to prevent cell detachment.
·Do not allow the samples to dry during any later step.
Treat cells with a fixative such as methanol, acetone, or paraformaldehyde to stabilize cellular morphology and structure. Fixatives also reduce or stop endogenous and exogenous degradative enzyme activity, limit autolysis, and help preserve antigenicity.
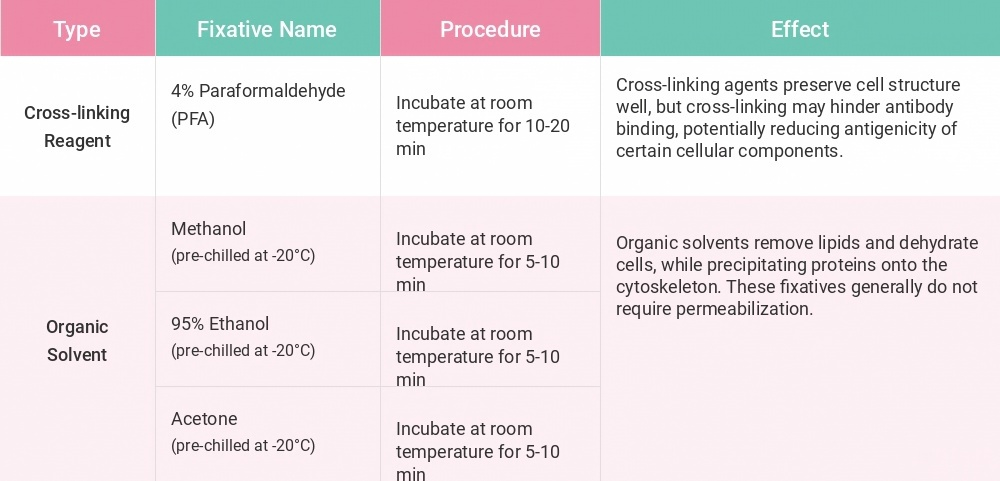
Figure 1. Basic ICC/IF workflow
Fix cells with 4% paraformaldehyde for 10–15 min.
Wash three times with PBS to remove residual fixative.
·For a first experiment, start with 4% paraformaldehyde for 15 min. If the result is unsatisfactory, adjust the fixation time or test another fixative.
·Longer incubation generally produces stronger fixation and may ultimately over-fix epitopes. Incubation that is too short may cause poor epitope preservation and under-fixation. Determine the optimal fixation time empirically.
Partially solubilize the cell membrane with a detergent to create pores that allow antibodies to reach intracellular epitopes. This step is optional. Because permeabilization disrupts the cell membrane, it is generally unsuitable when the target antigen is located on the cell surface.
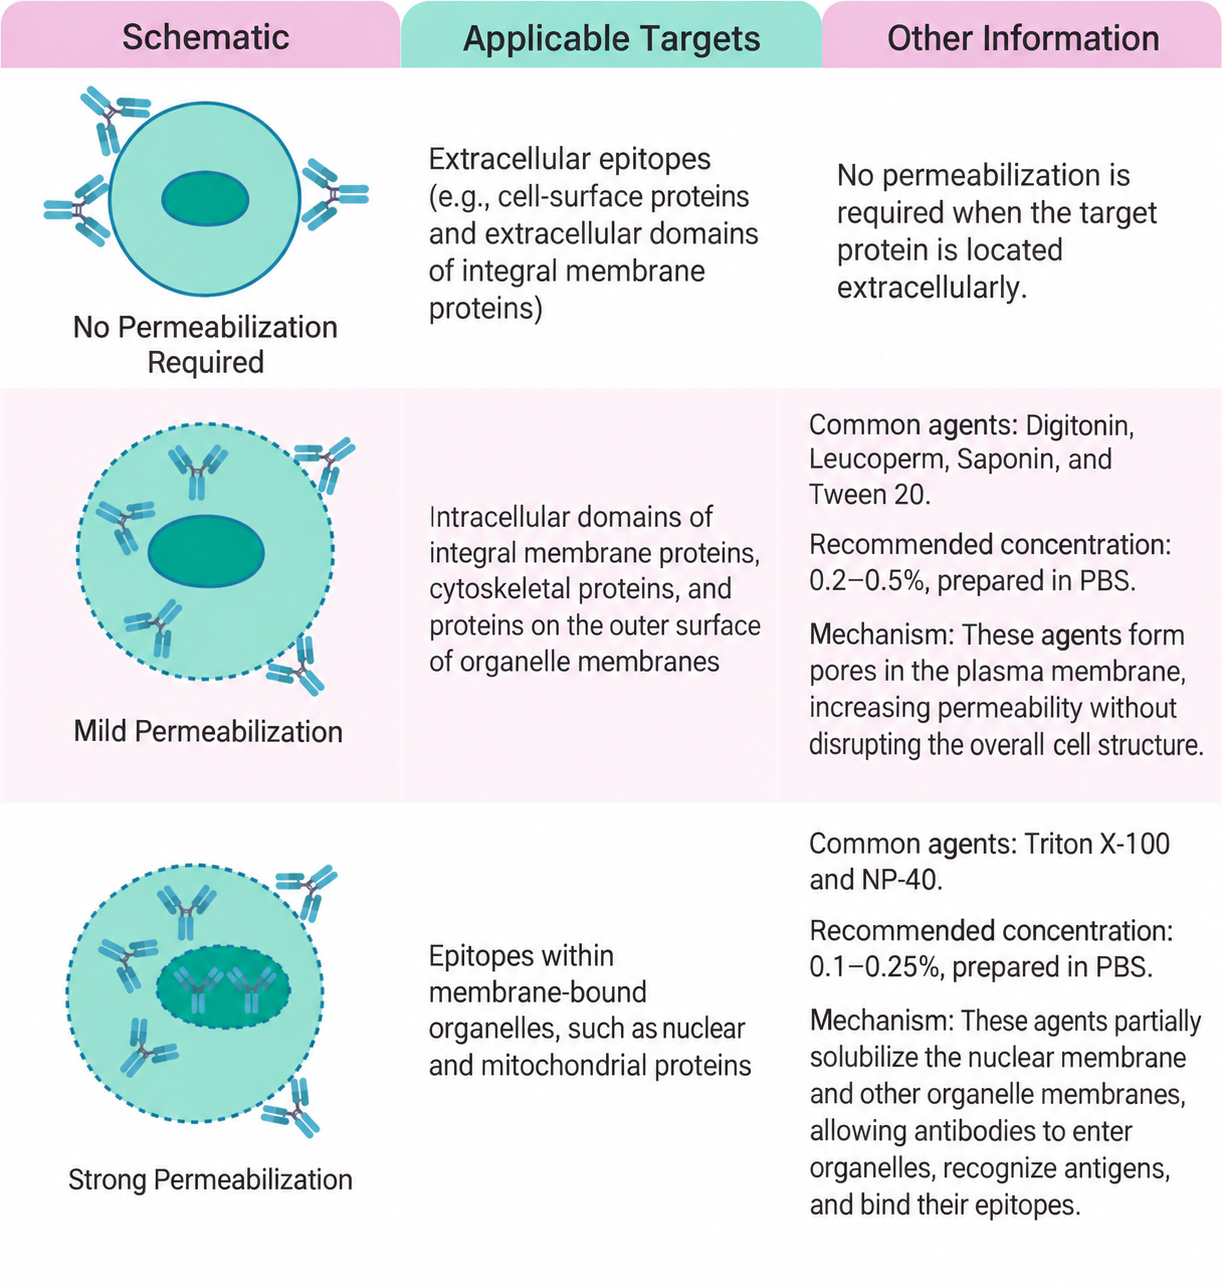
Figure 2. Schematic of cell-membrane permeabilization
1. Add 0.1–0.25% Triton X-100 prepared in PBS, cover the cells, and permeabilize for 5–10 min at room temperature.
2. Wash three times with PBS to remove residual permeabilization solution.
·Optimize the permeabilizing-agent concentration and incubation time for the specific sample.
Blocking components occupy nonspecific binding sites on the cell surface and reduce nonspecific antibody binding.
Use serum from the same species as the secondary antibody or use BSA. For example, if the secondary antibody is goat anti-mouse, goat serum is an appropriate blocking reagent.
Block with 2–10% BSA or goat serum for 1 h at room temperature or 37 °C.
·The blocking solution should not contain serum from the host species of the primary antibody, as this may increase background.
·Keep the sample moist. Drying can readily produce high background.
Allow antibodies to bind fully to the target-protein antigen. This determines the location and specificity of the fluorescent signal and therefore affects the accuracy and reliability of the result.
Two detection options are available: direct detection, in which the primary antibody is directly conjugated to a fluorophore; and indirect detection, in which a suitable fluorescent secondary antibody detects the primary antibody. Each method has advantages and limitations. Indirect detection is used most commonly.
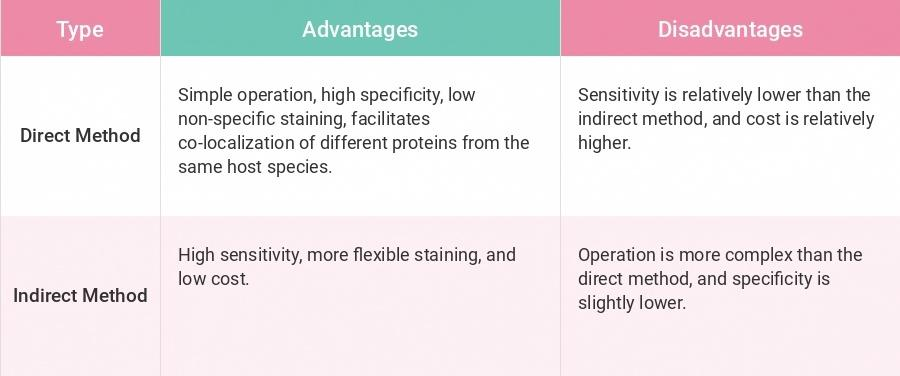
Figure 3. Direct and indirect detection
Advantages and limitations of direct and indirect detection
1. Single staining: the primary antibody may be raised in any host species. Select a secondary antibody directed against that host. For example, a mouse primary antibody requires an anti-mouse secondary antibody such as goat anti-mouse or donkey anti-mouse.
2. Double or multiplex staining: choose primary antibodies raised in different host species and match each with the appropriate secondary antibody. Select spectrally separated fluorescent secondary antibodies to avoid signal overlap. For three-color labeling, green, blue, and red fluorophores are commonly used to facilitate clear signal discrimination.
1. Primary-antibody incubation: select a primary antibody appropriate for the target antigen and sample. Dilute it according to the product instructions, add it to the sample, and incubate overnight at 4 °C for 12–16 h.
2. Wash: recover the primary-antibody solution and gently wash three times on a shaker with TBST or PBST for 5–10 min each to remove unbound antibody. Adjust the number and duration of washes as needed.
3. Secondary-antibody incubation: select a suitable fluorescent secondary antibody based on the primary antibody and the sample. Ensure that its fluorescence does not overlap with sample autofluorescence. Incubate for 1 h at room temperature in the dark and follow the instructions for dilution and use.
4. Wash: remove or recover the secondary-antibody solution and gently wash three times on a shaker with TBST or PBST for 5–10 min each. Adjust the number and duration of washes as needed.
·Protect the sample from light after incubation with a fluorescent secondary antibody.
·Determine an appropriate working concentration for the secondary antibody to avoid absent signal or excessive background.
·Maintain humidity in the incubation chamber and prevent sample drying.
·Use gentle agitation during washing to prevent cell detachment.
Stain cell nuclei to distinguish the nucleus from other cellular and antigen structures and to facilitate interpretation of the result.
Add DAPI to the washed cells and incubate for approximately 30 s at room temperature in the dark.
Protect the stained sample from environmental damage and preserve the result for subsequent analysis and comparison.
1. Place one drop of mounting medium on the slide. Slowly lower the coverslip with the cell-bearing surface facing the slide, then remove excess mounting medium with absorbent paper.
2. Gently seal the perimeter of the coverslip with clear nail polish to prevent movement during microscopy. After the seal dries, image immediately or store at 4 °C in the dark.
·Avoid bubbles. Add mounting medium slowly and evenly and gently adjust the coverslip with forceps. Bubbles interfere with microscopic observation and reduce accuracy.
·Choose a suitable mounting medium. Common options include buffered glycerol and antifade mounting media. Base the selection on the experiment and specimen.
·Protect mounted samples from light and maintain suitable humidity to reduce fluorescence quenching and drying.
·After mounting, cell samples can theoretically be stored for one week at −20 °C or 4 °C. For clear images and high fluorescence intensity, image them as soon as possible.
Observe and acquire images with a fluorescence microscope or laser-scanning confocal microscope, then analyze fluorescent localization and experimental outcomes.
The following examples show immunofluorescence patterns for representative subcellular structures reported in the scientific literature.
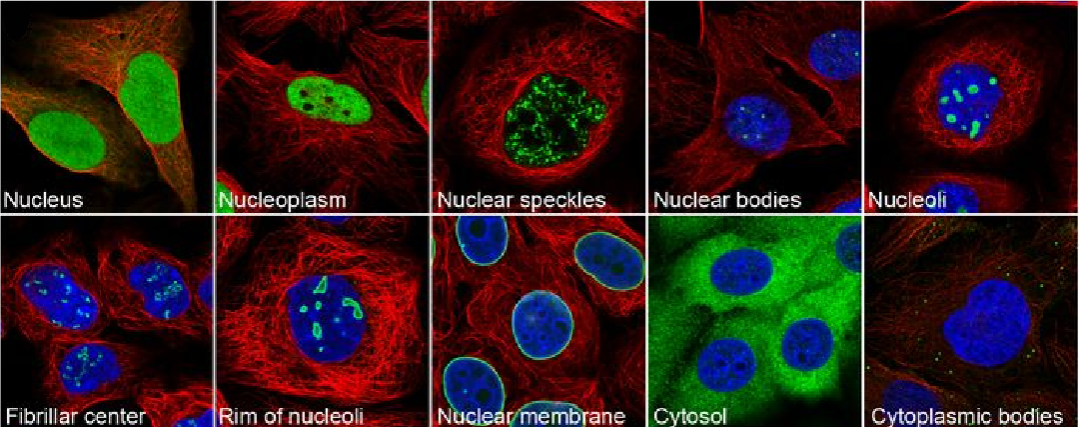
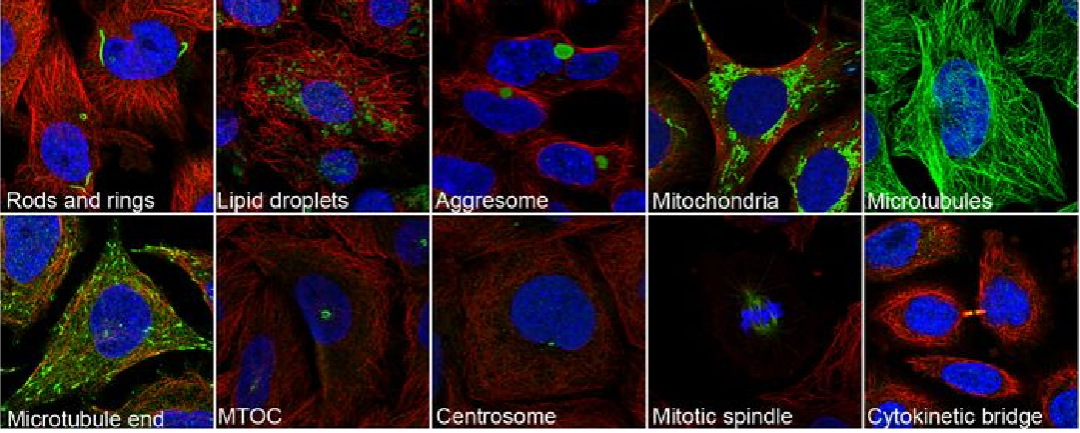
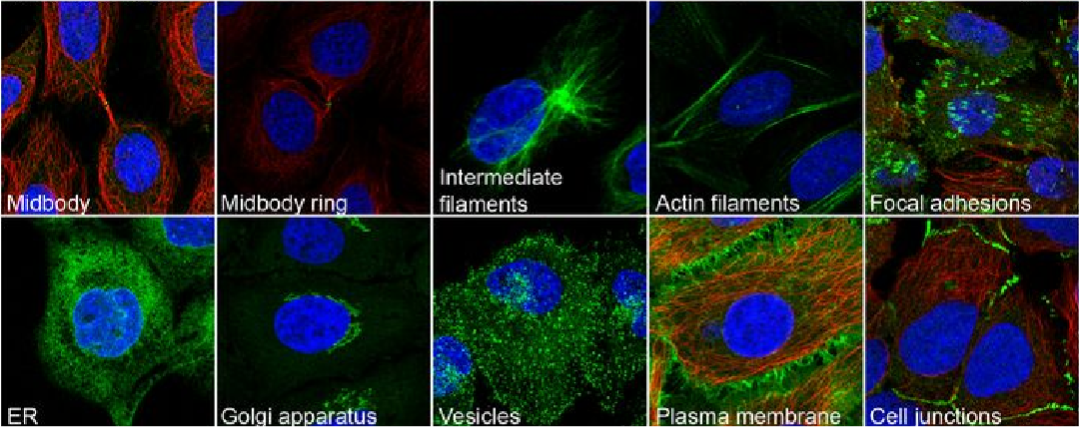
Figure 4. Subcellular localization patterns by immunofluorescence [1]
The ICC/IF workflow is now complete—from sample preparation and fixation through antibody incubation and final microscopy. Careful optimization at each step supports strong signal, low background, and reliable localization.
| Product | Description |
| Goat Anti-Mouse IgG H&L (FITC) (HY-P80950) | FITC-conjugated goat anti-mouse IgG antibody for ICC/IF and flow cytometry in mouse-primary-antibody workflows. |
| Goat Anti-Rabbit IgG H&L (FITC) (HY-P80951) | FITC-conjugated goat anti-rabbit IgG antibody for ICC/IF and flow cytometry in rabbit-primary-antibody workflows. |
| TRITC-conjugated AffiniPure Goat Anti-Mouse IgG H&L (HY-P81008) | TRITC-conjugated goat anti-mouse IgG antibody for ICC/IF and flow cytometry. |
| TRITC-conjugated AffiniPure Goat Anti-Rabbit IgG H&L (HY-P81007) | TRITC-conjugated goat anti-rabbit IgG antibody for ICC/IF and flow cytometry. |
| Alexa Fluor 647-conjugated AffiniPure Goat Anti-Mouse IgG H&L (HY-P81013) | Red-fluorescent Alexa Fluor 647 goat anti-mouse IgG antibody for cell and tissue immunofluorescence. |
| Alexa Fluor 647-conjugated AffiniPure Goat Anti-Rabbit IgG H&L (HY-P80952) | Alexa Fluor 647 goat anti-rabbit IgG antibody for ICC/IF, IHC-F, flow cytometry, and ELISA. |
| Alexa Fluor 488-conjugated AffiniPure Goat Anti-Mouse IgG H&L (HY-P8005) | Green-fluorescent Alexa Fluor 488 goat anti-mouse IgG antibody for ICC/IF, IHC-F, flow cytometry, and ELISA. |
| Alexa Fluor 488-conjugated AffiniPure Goat Anti-Rabbit IgG H&L (HY-P8002) | Green-fluorescent Alexa Fluor 488 goat anti-rabbit IgG antibody for ICC/IF, IHC-F, IHC-P, flow cytometry, and ELISA. |
References
 LinkedIn
 Researchgate
 Instagram
 X
X Facebook
 WhatsApp
 Reddit
 Mail
Mail